Matt Sep 13, 2011
Intro to Photography Class
Better known as Reddit Photoclass
04 – Focal Length
In this fourth lesson, we are (finally!) going to start discussing the meat of photography technique, with a very important parameter: focal length.
As we saw in lesson 2, focal length is what determines how “zoomed in” you are, also often called angle of view. Focal length is an actual length, expressed in millimeters (it corresponds to the distance between the optical center of the lens and the film plane, though you need not worry about that). The lower this number, the less zoomed in you are. We speak of a wide angle, since you can view much on the sides: you have a wide view. Conversely, if the number is high, the angle will be narrow and you will only see a small portion of what is in front of you: you are zoomed in, this is what we call a telephoto.
Though we will see later that it is not exactly true, as an approximation, you can zoom with your feet: walking 10 meters closer to your subject or adding 5mm to your focal length will result in the same image (these are random numbers, by the way). The choice of a focal length is the very first step in composing a photograph, and probably the most important, as it determines framing. All the other choices (exposure, depth of field, etc) are dependent on your framing having been decided on.
So far, so good. But things become a little bit more complicated when you start looking at the actual numbers. An 18mm lens on a medium format camera will produce a very different angle of view than the same focal length on a compact camera. A modern compact like the Canon S90 has focal lengths between 6.0 and 22.5mm, yet the same values on a lens for a FX DSLR like the Canon 5D would be unbearably wide and totally unusable.
The culprit is what we call the crop factor. The focal length is a physical property of a lens, but the resulting angle of view, which is what we are really interested in, depends on another factor: sensor size. The bigger the sensor, the wider the angle of view for the same focal length. In order to convert angles of view between different formats, we use the crop factor, which is a ratio between the standard 35mm film area and the actual sensor size. For instance, Nikon DX cameras have a smaller sensor than their FX counterparts, which results in a 1.5x crop factor. This means that a 28mm lens on a DX camera will have the same angle of view as a 28*1.5=42mm lens on FX. This explains why, when DX cameras started appearing, the focal ranges of most lenses changed accordingly: the 18-200mm DX lens counterpart is the (just announced) 28-300mm FX lens, etc.
Of course, this works in the other direction too: if your sensor is bigger than 35mm film, then you will need longer focal lengths to obtain similar angles of view: on 4×5 large format cameras, 150mm is considered normal, whereas it would be firmly in the telephoto domain on a DSLR.
Because it can all be a bit confusing, especially with lenses that can be used on several different formats, it is common to give a “35mm equivalent” focal length: the focal length which on a 35mm/FX camera would give the same angle of view.
Concretely, you just need to be careful when discussing actual focal lengths: remember that the final angle of view (which is probably what you are discussing) depends on the crop factor, and that everyone may be using different ones.
Remember how a bit earlier, I said you could zoom with your feet? Well, it’s not quite true. The reason is that perspective will change. One effect of using a long focal length is that it will compress perspective, making everything appear to be on the same plane. Wide angle, on the other hand, will exagerate depth, sometimes to extreme lengths. This is why landscape photographers like to use ultra-wide lenses.
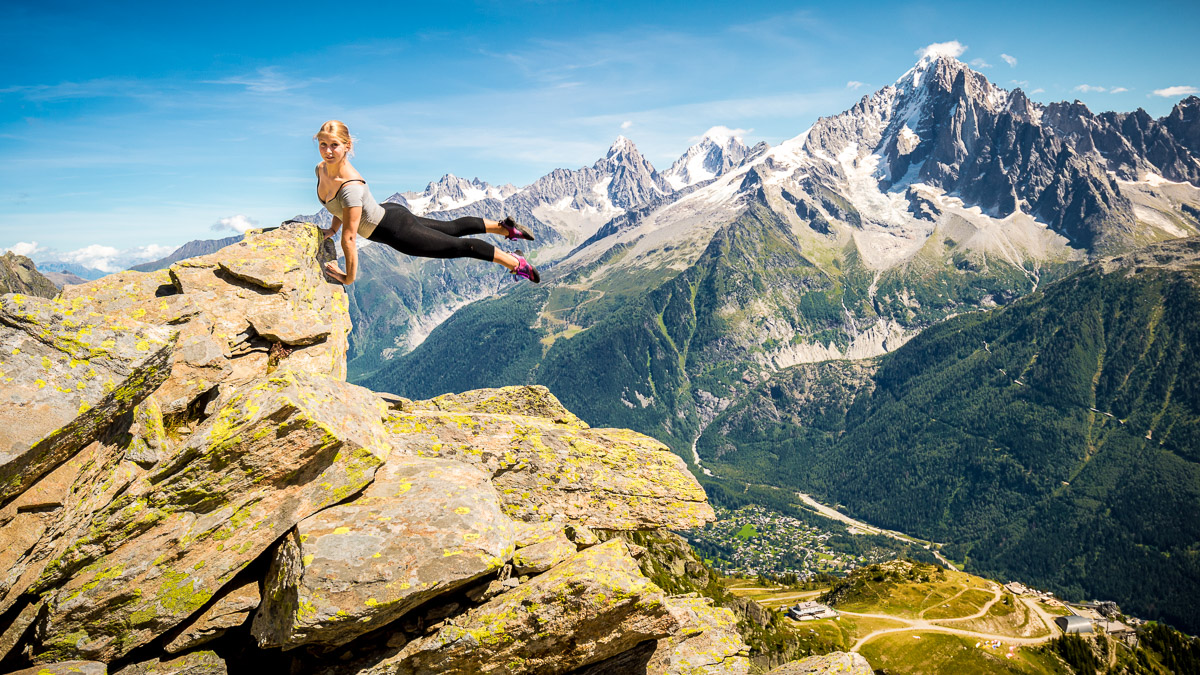
Compare for instance this image, shot at 16mm (with a 1.5x crop factor):

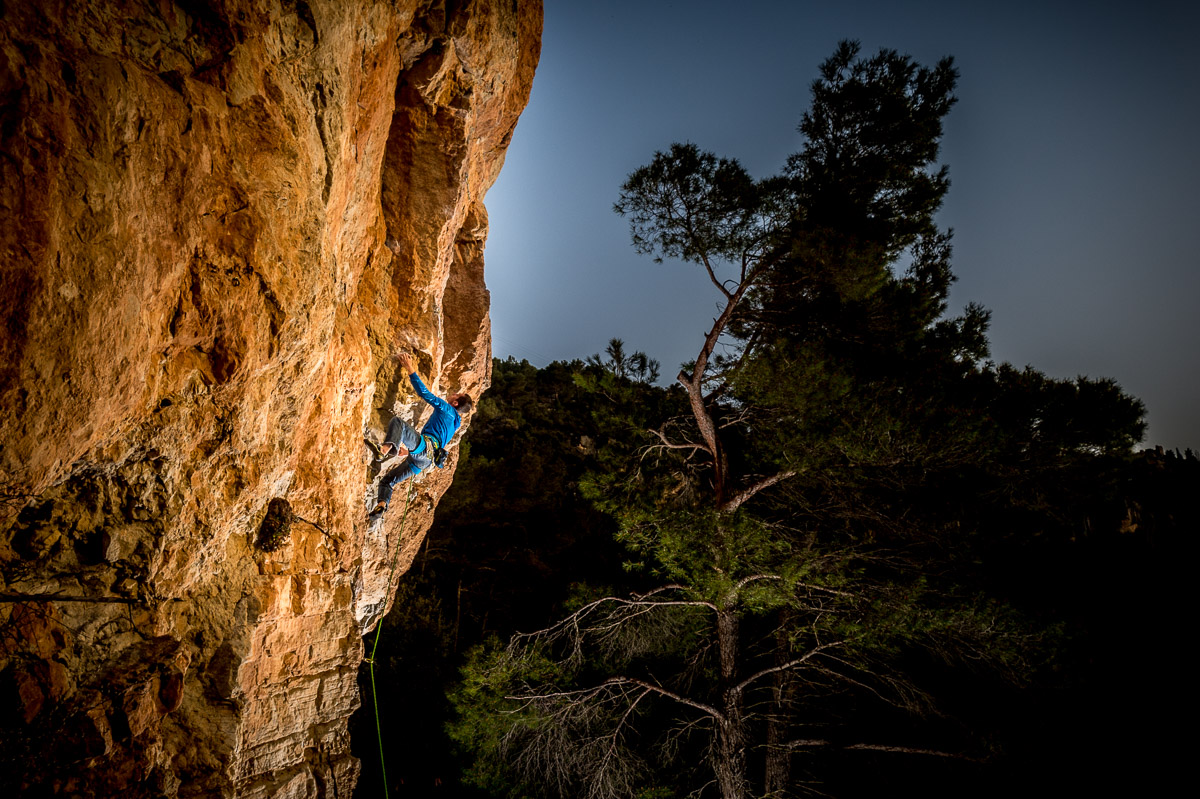
to this one, at 155mm:

Notice how in the second one, the moon seems to very close to the mountain, while in the first one, the climber appears very far away from the ground (he wasn’t more than 8-10m up)? This is an effect of focal length, and a very important creative tool at your disposal.
Sometimes, it will be worth getting closer to your subject and using a shorter focal length, if you want to create depth and emphasize perspective. Sometimes, you will have to walk backward and use a longer lens, if you want to compress perspective. You can sometimes see this effect in movies, usually when someone is feeling sick or about to pass out, and the relative position of objects seems to change but the framing remains the same (see this youtube extract from the Goodfellas). This is achieved by moving forward while zooming out at the exact same speed.
Now that you know more about focal length, let’s take a look at the different ranges usually found in lenses, and what their uses tend to be. Of course, there are many, many exceptions, but this is the “normal” use they were designed for. All focal lengths are given for 35mm sensor size (crop factor 1).
- Ultra-wide angle – 14-24mm: They are pretty specialized lenses as they will tend to exaggerate perspective to levels which can easily be disturbing. Our eyes are not used to such wide angles of view, and they will look unnatural, which can be used for artistic purposes. Landscape and architecture photographers love these focals as they will create a lot of depth and emphasize perspective.
- Wide angle – 24-35mm: Wide enough to show a lot of context, but not so wide that they look unnatural, they were used a lot by photojournalists. It is a good “default” focal range, which explains why most kit lenses include them (18-xx lenses on DX DSLRs, for instance).
- Normal – 40-75mm: What exact length a normal lens should be has been subject to a lot of debate, but it is estimated to be around 45mm. This is an angle of view which looks very natural and “inoffensive”, neither too wide nor too tele. It also corresponds more or less to the focal length we actually perceive (though due to peripheral vision, our eyes have an estimated 22mm focal). Street photographers love these lengths.
- Mild tele – 85-105mm: This is prime portrait category: long enough to isolate the face and create separation from the background (through shallow depth of field, more on this in another lesson) but short enough that you can still be within communicating distance from your subject.
- Medium tele – 120-300mm: Just like wide angle, this is very polyvalent focal length which can be used in most genre to isolate details and simplify compositions. For landscape work, remember about the “perspective flattening” effect.
- Long and exotic tele – 300-800mm: Those are specialized lenses for wildlife and sport photographers who need to get close to their subjects but can’t physically move. They are complex and very expensive lenses, and their angle of view is so narrow that it won’t be of much use to most photographers. Tripods and fat wallets are often required.
Assignment
The assignment today is about getting a bit more familiar with focal lengths. You will need a camera and a zoom lens (or a series of prime lenses). Go somewhere where you can walk freely. Bonus points if there is a mildly interesting subject. Start by staying immobile and take a picture of the same subject at 5mm increments for the entire range of your lens (compact cameras users, just use the smallest zoom increments you can achieve). Now, remember the framing of your most zoomed in image, walk toward the subject and try to take the same image with the widest focal you have.
Back on your computer, compare the last two images. Do they match exactly? What are the differences? Take the series of immobile pictures, reduce the size of the most zoomed in image and overlay it on top of the widest one. Does it match exactly?
If you are not tired yet, try taking a wide angle image which emphasizes perspective and a tele image which makes use of perspective compression.
Previous lesson: Different Types of Cameras
Next lesson: Exposure, pipes and buckets
44 Comments
-
-
What about this scene, this is far more popular https://www.youtube.com/watch?v=NB4bikrNzMk
the JAWS shot -
Exactly what I thought! Zooming in creates the flatter image so they must have been zooming in while moving away from the table.
-
-
Thanks for this assignment. It really emphasized the impact of zoom versus being physically closer and the impact that it will have on your subject and its surroundings.
-
I think I agree with Matt… The description you have for the goodfellas shot seems backwards…
-
I think I agree with Matt… The description you have for the goodfellas shot seems backwards…
-
https://imgur.com/a/Lm5mC#0
Iam using NikonD3100 camera with 18-55mm, 1:3.5-5.6 Gll lens. This is my first ever DSLRIn above submitted link, I’am increasing the focal length (18-24-35-45-55mm) keeping 1/f constant at 5.6, and found that picture frame (is it called depth of field?) changes. I mean to say with increase in focal length, less and less area in view is covered. Since 1/f was constant the picture brightness remains constant. No change in shutter speed required to keep the picture brightness at same level.
Also as asked in assignment, last (18mm, taken from 3-4 feet from subject) and second last(55mm taken from 15 feet from subject) picture, isn’t same. One taken from nearer looks like bended !
Have also taken the snaps of the same subject but this time keeping the focal length stagnant at 18mm and changing the 1/f from 3.2, 3.5, 4.3, 4.8, 5.6. I found out that in this case picture frame remains constant but for each of the above f-stop I had to decrease the shutter stop by one step to keep the light meter at same place !
Never before did I realized the importance/impact of changing the focal length and 1/f. It lot clearer now.
Thanks. -
I took some photos of my cats on the couch at 5mm different zoom intervals. From the farthest zoomed-in image to the physically close/zoomed out image, there was quite a difference. The close up/zoomed-out image definately shows more perspective. I had somewhat of a difficult time getting the framing the same for the comparison images, but I think that is mainly because of the perspective differences. Good excersise.
-
I found this too! To get the cat the same size (I also used my cat), “physically” zooming/walking closer leaves more in frame. In addition, with my 75-300mm lens I actually couldn’t get close enough and still be in focus to imitate the 300mm length (zoom lens).
-
-
This is a great introductory course, but I wish you would caption your photos with EXIF data and maybe a little blurb. For example I don’t know what the last photo in this lesson is supposed to be demonstrating.
-
I’ve just joined this online class and what I’ve seen I really like it. In this session, you mentioned overlapping images to see the difference. Can you tell me how to overlap images. My photo processing software is the Nikon View NX2. I can’t afford the Adobe photo shop.
-
I don’t know how to use View NX, but just wanted to let you know that with Creative Cloud, Adobe now has a photography bundle. It’s $9.99 a month and gives you access to both Lightroom and Photoshop (as well as some other stuff like their mobile apps, a Behance account, etc.). Definitely more affordable than the $500 PS + $150 LR you had to pay previously.
If that’s still out of your price range, you can get the GIMP (http://www.gimp.org/) for free. It’s open source, not as well documented, not nearly as many tutorials out there, so you may need to be a bit more computer savvy to run it. It’s not as easy to use but it is very powerful.
-
-
This was really an interesting idea – plus I got to try to figure out GIMP to do layering to see the differences better. I learned a lot about the focal and color depth – even though I was just capturing a candle. The color depth difference was amazing to me – considering I’m using a compact camera capturing a candle.
It can be viewed at: https://www.flickr.com/photos/135574427@N03/22565334076/in/datetaken/
-
[…] What do you like to take photos of? Every genre of photography has its standard focal lengths. So really it’s about where your passion in photography lies. Here’s a good article that explains it in depth. […]
-
This was my first time playing with the focal length, so it was a bit tricky to figure out.
-
Yeah !! This is the best example. 🙂 Look at the two black dots in the wall to the left of the figurine. You’ll see that with a zoom in you can see only one dot, but from close up you see 2 black dots.
-
-
I found that walking closer to the subject is better and has higher resolution of a photo. http://imgur.com/a/4B3VU
-
Just started this course. Loving it. Question on this assignment…with a Nikon d5100, should I leave this in auto mode or work in manual?
-
Play with both. I’m just getting into photography myself and I find playing with both helps me understand what the camera is capable of and how to adjust everything accordingly with the current situation in a more efficient manner.
-
-
When attempting to take the shot by physically moving closer to the subject in order to match the photo taken at the longest focal length (most zoomed in), I had a lot of trouble. I wasn’t sure if I was supposed to match the size of the subject or everything at the border of the frame. I realized that whichever I matched, either way those two images could not be matched. When trying to match the subject size, there was more stuff included (“a wider view”) in the picture taken by physically moving closer to the subject. When trying to match the size of the stuff near the border of the frame, my subject’s size appeared much smaller. As Kayla and Kelly mentioned in the earlier comments, the shot taken from further away/most zoomed in showed more perspective/depth while the shot taken by being physically closer/most zoomed out appeared more planar.
If anyone was able to do the bonus question (“try taking a wide angle image which emphasizes perspective and a tele image which makes use of perspective compression”), please share your images! I was confusing myself so much in remembering what perspective I was trying to achieve with either wide angle and tele image.
-
I don’t have a zoom lens so I took a picture using a prime 25mm Olympus modern lens and a cheap 35mm CCTV camera lens adapted to my Olympus OMD EM10. Guess which one is which.
http://i.cubeupload.com/GJELsm.jpg
http://i.cubeupload.com/goALax.jpg
The angle of view is not dramatically different, but the focal length of both lenses are both standard “wide angle” lenses.
-
This was a very interested exercise for me. I used a kit Canon 18-55mm lens with the shots at 18/35/55. I then approached the hydrant and shot it at 18mm. The most noticeable impact that I saw was the loss of depth you have when you are zooming in versus physically approaching the subject. If you look at the dirt pile just over the top left of the hydrant in the third image versus the fourth, the depth of field and the scope are significantly different versus trying to shoot the same shot just physically closer without any significant zoom. Interesting exercise.
-
Your photos were so helpful – I couldn’t visually understand it until I saw the difference with the pile of dirt. Thanks so much.
-
Great example!
-
I know this is several years later but your photos are very helpful!!
Big thanks to labeling which is which zoom/no zoom!
-
-
This was a pretty interesting exercise! I conceptually knew what would happen, but going through it really highlights the differences and will probably allow me to think about this in a completely different way than I was.
-
Great exercise! To make images appear more deep, stand far away and zoom in. To make images appear flatter, stand closer to your subject. I feel like this will be really valuable when working on more complex compositions.
-
Actually, it’s the opposite! If you zoom in, you will achieve a flatter, more two-dimensional look. If you walk closer to the subject, you’ll get a much greater sense of depth in the photograph.
-
-
[…] What do you like to take photos of? Every genre of photography has its standard focal lengths. So really it’s about where your passion in photography lies. Here’s a good article that explains it in depth. […]
-
I found a cactus out and about that had enough objects to show the focal length effect on spacing
https://lightroom.adobe.com/shares/dc35d5a5093b4d97812c06cd0000273f
-
https://www.flickr.com/photos/157505431@N02/
I wasn’t able to lay the photos on top of each other to compare the differences, but in the photo where I was zoomed I got more of the trees between where I was standing and the building. In the photo where I walked closer to try and get it the same in the frame there was more of the trees and environment behind the building in the photo
-
great exercise. How do i post my images?
-
https://www.flickr.com/photos/183777127@N04/albums/72157710562761532/with/48627231683/
So my most zoomed in picture and my “recreating” picture were not the same. In the most zoomed in picture i got part of the monkey bars and the edge of the picture was just a little past the gas pump. In the picture where i was to physically move closer with the wide shot i lost the old monkey bars and the edge of the picture was further away from the gas pump.
This was a good assignment! It really helps with noticing the difference! -
https://www.flickr.com/photos/185769316@N04/albums/72157712209675853
“Do they match exactly?”
-No“What are the differences?”
-Well…It seems the more I zoomed in, the more info was let out of the picture (cropped on the sides). In the max zoom point, I can now see just a couple of trees and the bench behind the subject, while in the wide picture I can see a lot more objects. Also in the zoomed picture, the background (bench, trees) seem closer to the subject (statue), while in the wide picture shot the objects are way behind.“If you are not tired yet, try taking a wide angle image which emphasizes perspective and a tele image which makes use of perspective compression.”
This was awesome. Indeed the wide angle shot adds perspective to the shot. I personally find the subject more interesting to the eye of the viewer.The tele image shot was also cool. The columns seem to be closer one to another. I’m guessing that with a better camera this effect would be even nicer.
Thank you!
-
https://flic.kr/p/2imK8q8
https://www.flickr.com/gp/186686528@N06/E3A7z2
I found that the more I zoom the more of the frame is cropped. When I step forward I maintain more of the frame and still get closer to my subject. First link is stepping , second link is max zoom -
https://onedrive.live.com/?id=5592BE6C916806B2%218918&cid=5592BE6C916806B2
Interesting to see how perspective changes with focal length and distance.
-
https://www.flickr.com/gp/189077968@N06/DP19x4
My framing isn’t perfect, but I especially noticed on the image where I moved forward to try to recreate the max zoom image, there is much more depth/the door looks farther back.
-
Completed this exercise using a Canon EOS 80D DSLR with 18-135mm Nano IS USM lens. Lined-up two nightstands of equal heights about 3ft away from each other. Placed a mug on the front nightstand (foreground) and a pitcher on the back (background) nightstand. The exaggerated depth of the pitcher from the mug can be seen in the second photo, where the photo was taken with the smaller of the two focal lengths (18mm vs. 85mm). The longer focal length in the first photo can be seen compressing the perspective and giving the effect that the pitcher is on the same plane as the mug.
Camera Specs:
Sensor
– Resolution: 24.2 Megapixel CMOS sensor
– Size: 22.3 x 14.9mm
– “Quality”:
– Pixel size: 3.72µm
Lens
– Focal length: 18-135mm
– Aperture: f/3.5-5.6
– Focusing system: AF Nano USM (UltraSonic Motor) w/ FT manual focus
– Stabilization system: IS
Body
– Shutter: 30 – 1/8000 sec
– Light metering: full aperture. Through-the-lens (TTL)
– Focus detector: contrast, phase detection
– Storage: SD
– Framing: optical viewfinder & LCD -
In this link you can find the first task where we increase focal length, i didn’t go in 5mm increment because it would take me a lot of time to go from 15mm to 300mm haha instead i used the pre-defined focal lengths that my phone supports (every focal length used is burned in each picture)
I also added my tries on wide angle and perspective compression.
-
l5igto
-
ii0od9
-
co5f38
-
49mlpm
About the Goodfellas scene, “This is achieved by moving forward while zooming out at the exact same speed”
I think it is the opposite. The depth is becoming more compressed, less exaggerated, along with less wide of a view through the window.
This means the camera was moving away from the window while zooming in.